I feel like every web browser is “good enough”. There’s nothing I’m excited to use, and I keep switching defaults after one annoys me enough. 💽
tech category
I made some tweaks to my blog’s navigation styles so they’re less cramped on mobile. I’ve modified a pre-existing theme, even though my day job is writing custom themes. There’s lots I’d like to tweak, and one day I’ll carve out the time. 💽
I’m a certified Twig Designer. Please, one at a time!
 is recognized by the Symfony certification program as a certified Twig 3 Designer TWIG. Certified Designer. 3 Falien Potencier. Fabien Potencier, Symfony CEO](https://cdn.uploads.micro.blog/111874/2025/cleanshot-2025-05-22-at-16.18.492x.png)
Stop all the news: I updated my Uses page.
Ever in a #Neovim :terminal, and want to open a file without having to back out to normal mode, or have a nested Neovim instance? There’s several ways to do this, but here’s a simple one.
Add a shell function that tests $NVIM, which is set to the server pipe when inside a Neovim instance. If Neovim is running, replace the nvim command with an alias that passes the --server and --remote options.
Here’s a complete example for the Fish shell, but it should be easily adapted to others.
#!/usr/bin/env fish

function nvim --description "Open Neovim within the same instance, if one is running"
  if test -n "$NVIM"
    command nvim --server "$NVIM" --remote $argv
  else
    command nvim $argv
  end
end
I switched to the Hack programming font in my terminal and IDE, and really enjoying it. Functional, readable, and nice to look at.
Why does every macOS app ask for permission to access my local network?
When trying to type event.target.closest(), I instead wrote event.target.closet(). It took me too long to debug.
Currently, this is an embarrassing mistake. However, if we bug the ECMAScript standards committee, all event targets can have their own closet.
Brian Kardell and Eric Mayer have a good discussion on the Mozilla privacy policy changes over at Igalia.
Restore those cool hidden macOS calendars
Years ago I wrote about interesting hidden calendars in macOS.
I hadn’t tested this in a long while, until I happened to think of it the other day. In that time Apple had removed the calendars, …
Read moreI gave a whimsical talk introducing #git at Florida #Drupal Camp, and published it as a blog post. I’m very proud of it. Open to any feedback!
Grokking Git: A Fantasy Story
Git is a big part of a lot of tech worker’s every day lives, but it can be confusing to use. …
Read moreI’m on the Lullabot Podcast talking about Single Directory Components! #Drupal #SDC
Jason Koebler nailing the sentiment in OpenAI Furious DeepSeek Might Have Stolen All the Data OpenAI Stole From Us
I will explain what this means in a moment, but first: Hahahahahahahahahahahahahahahahahahahhahahahahahahahahahahaha.
My CLI wrapped most used commands.
- 3732
git - 1471
ls - 1289
rg - 856
ddev - 745
nvim - 546
mv - 534
cd - 510
rm - 477
yarn - 453
cat
Generated with history | awk '{print $1}' | sort | uniq --count | sort --numeric-sort --reverse | head -10.
After exhaustive research and countless hours over nights and weekends, I’ve compiled the authoritative demographic info on the audience for each vi derivative.
- Neovim: devs wanting a hackable IDE
- Vim: sysadmins who work primarily over remote terminals
- Vi: FreeBSD devs
- Ed: The criminally insane
I’m very excited that I’ll be giving my first session at Flordia DrupalCamp 2025: Grokking Git. Hope to see you there! #drupal #git #lullabot
Debra Lawal has an excellent essay on gender bias in hard work vs natural talent.
As a dude and a senior software developer, let me say unequivocally that I have no natural talent. Like, zero. Any skill I have is through effort, and I’m not unique in that way.
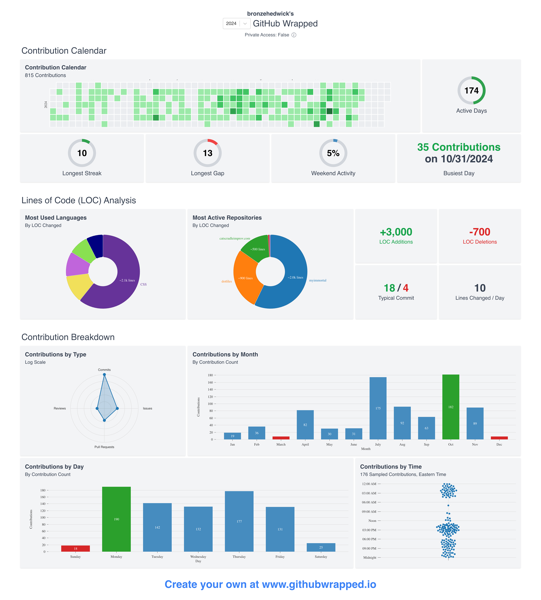
Fun little wrapped project for Github.
Had a lovely time at NEDCamp as always. Thanks to all the organizers and speakers for such a great con.
TIL that there is a tac command that is like cat, but prints the lines in reverse. Maybe I’m uncreative, but…why?
Had a great time at #smashingconf. Thanks to all the speakers and organizers and staff. Everyone was very kind and approachable and I learned a lot.
TIL the word “Tesselate”, which is a repeating pattern, like a honeycomb. ⬣
TIL background-blend-mode and a background-image is the only way to do a mix blend mode on an image. You can’t do that with an absolutely-positioned <img> tag.
From @andy_blum.
My smart talented colleague Laura Donalan is co-leading Untangling Your Drupal Migration: Lessons from the State of Iowa. If you’re considering any CMS data migration, it’s well worth a look.